IKEA Overload

Untitled

Our lastest venture was our most recent trip to Ikea. It definitely wasn’t the relaxing, grab a few things type of weekend that I thought it would be. I knew that we needed a Uhaul, but what I didn’t realize was that we would need a 26-ft long one. I originally thought that it was a little overkill, but after 12 hours inside of an IKEA, it’s pretty easy to fill one up.

Untitled

Before arriving in Frisco, TX, Tyler and I had made all the preparations for the trip:

-money – check (after many hours of back and forth with the bank)

-driving arrangements – check

kitchen design – check

-hotel booked – thought so, but no, no check

-list of items to buy – check for the first night, but not the second

Our plan was to arrive in Frisco Saturday afternoon, with a couple of stops in OKC to pick up Sheilah, Tyler’s mom,  and to shop at a nearby retro shop. Then, we planned to  leisurely make it into Dallas to shop at a few more vintage shops, and then finalize a few decisions at Ikea before heading to bed at a reasonanble hour. The only thing that actually happened, was picking Sheilah up and shopping at one vintage shop in OKC. Well long story short, the reason our plans were altered was because, between Saturday and Sunday, we were inside of Ikea for a total of 12 hours. Needless to say, we never made it into Dallas, and that most of our preparations did not work out.

Even though the weekend was a little stressful we did accomplish a lot. We bought our entire kitchen, appliances and all, our master bedroom closet stuff, a couch, our patio furniture, some storage items, some accesories and more..

Here are some pictures of the trip

Breakfast before the rude awakening of how many boxes we were going to have to load that day..

Untitled

Everything you see here, was our first load.. Our Kitchen..

Untitled

The kitchen minus the appliances loaded up.

Untitled

Round two: This is only some of the second load, a couple carts had already been loaded.

Untitled

Everything loaded. We were definitely thankful Kent and Sheilah came along..

Untitled

So now that everything is unloaded at the house, 12 hours of Ikea, equals a whole lot of hours of installation…

And other news:

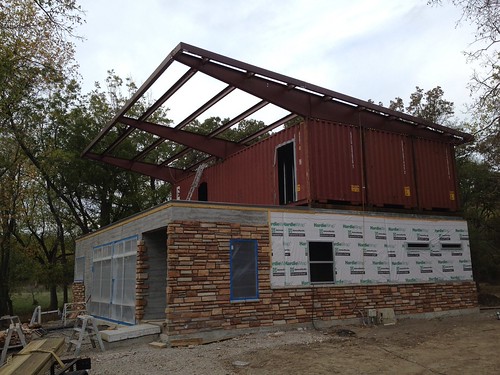
 -The sheetrock is almost complete, after many hours of Tyler, my dad, my uncle Chile, Matt, Kent and others hanging it. We have hired someone to do the finishing touches on it and they should be done this week.

-Our cork floor arrived from Canada today for our bottom two containers

Advertisement

Mini Update!

A lot has happened on the Bright Container House, but they are mostly “in progress”, so for now I am going to post a mini update about our front door and our upstairs storage room door.

I believe the most stressful thing so far has been, picking the front door paint color. I know it sounds a little menial, but it has seriously given me ulcers (ok, I may be exaggerating a bit, but not that much really.)

As you can see from this picture, there have been a few options, mostly unsatifactory ones though. There were maybe 3-4 more not shown in this image. After a lot of imagination we came to a decision. This decision, ended up being the wrong one, but more on that later.

Untitled

The first step was to fill in the nail holes with painter’s putty.

Untitled

Here is Tyler doing just that…

Untitled

The next step was to sand the door

Untitled

and then sand some more…

Untitled

Whoops, forgot a photo.. but the next step was to tape off the edges that did not need to be painted. Because the interior part of the door along with one of the edges will be stained later.

We then started painting, I rolled and Tyler painted the trim pieces with a brush.

Untitled

Untitled

So fast forward a few days, and repeat these same steps with different paint (since the first paint was a bust) and you get to this..

Untitled

We then added some hardware, and I think its gunna work.

Untitled

A few additional steps to complete our front entry is to finish the stone work on the sides, add the final cement board trim piece beside the door, paint the trim around the door, tile the “porch”, purchase a door bell and then add the decorative lighting and plants.

Here is the doorbell we have picked out..

Z019111

And for the lighting we are going to alter a pre-existing globe light we have to become more suitable for outdoor use.

And it will look something like this..

And then to add a little flair to the porch, I will add our bullet planter, one just like this actually…
image from Flickr.com
Less intestesting, but progress none the less…
Our upstairs storage room door was painted. Steps will be added, and we may decide to add a window later to make it more visually appealing.

Untitled

And since I didn’t realize I never posted a picture with the finished cement board siding… Here it is:

 now just a little more stone work, trim around the deck, and deck railing, our exterior will be complete.

Untitled

and Now to Polish it Off…

For our main living area’s floor, we decided to go with a polished concrete. This decision saved us in material, and helped us continue with our earth friendly building approach. No sealant or chemicals are used to finish the floor, and it is low to no maintenance, with no future re-sealing or re-polishing.

Architectural Concrete Technologies did the work for us, while Tyler and Matt continued on the siding and other things.

The first step was to fill in the relief cuts with an epoxy. We chose a lighter grey color to contrast with the darker grey concrete.

Untitled

When the epoxy is first applied it looks a little messy, but once they start grinding the concrete, it becomes flush with the floor.

Untitled

They used a remote controlled grinder with diamond abrasives to do most of the work. To get the final product they had to grind, hone and polish the floors to a 3000 grit polish. We thought we were going to have to stain the concrete to a darker grey, but the color turned out just as we would have hoped.

Untitled

Here is a close up of the floor. We had them finish it to whats called, in concrete polishing terms, salt and pepper. Where it is ground down just enough to see a little aggregate.

Untitled

One of the greatest parts of the concrete floor can sometimes be its flaws. Small cracks, dings and other imperfections gives the floor more character. In this picture below is an area where more aggregate is showing through. This is caused by the uneveness of the slab.

Untitled

This picture shows the slight shine of the floor under the lights.

Untitled

Sadly enough, right after the floor was finished and dry, Tyler and Matt had to cover it up with paper to prevent it from receiving any damage during the duration of construction.

Untitled

The floor was definitely better than imagined, and we can’t wait to pull the paper back up and enjoy it.

Progress Update!

This post may seem like a repeat, and it should since the bottom story steps are practically the same. So feel free to skip the explanations and just check out the pictures if you have been following along. (Don’t forget to click on the flickr link to the right to see  all of our pictures!)

Progress:

-Metal studs were used to frame out the upstairs, we chose metal studs since they are made from recycled materials, recyclable, and weather, fire and termite proof.

-The outdoor electrical receptacles were roughed in

-Open cell spray foam, with a R-40 insulation value was applied to the top story

-Wafer board and house wrap were also installed

-The flue for the fireplace was ran on the outside of the house inside of a chase wall

-Stained cement board lap siding is currently be installed, we chose this material for its durability and design qualities

Here is a picture of some of the metal studs and the electrical:

Untitled

Spray foam application:

Untitled

Untitled

Untitled

Wafer board and house wrap:

Untitled

Cement board siding:

Untitled

Untitled

Untitled

The chase and flue:Untitled

Other progress updates include:

Our door windows were installed, now its just waiting for paint, which I’m thinking a nice retro green color.

Untitled

Matt and Tyler tested the flue’s ability to draw smoke out with success! 

Untitled

After a few more full days of siding, the inside progress should finally begin! Now I may get a chance to actually help out…

Rain Collection

Recently Tyler and I purchased a used, 12,000 gallon water collection tank from a guy in Claremore. Our original plans were to buy a new 2,000 gallon tank to help supplement some of our outdoor water needs, but when the larger tank showed up on craigslist for the same price, we could not pass it up. The 35ft tank will be buried behind the house, and will collect the rain to be used inside and outside the house.

Here is a picture of our new tank, it will require just a little rehab work before we can use it. There is a hole we need to patch, and the inside had to be cleaned and scrubbed.

Untitled

Here is a picture of the inside of the tank before Tyler cleaned it:

Untitled

And here it is after:

Untitled

Our roof, given 1 inch of rain will yield 1,108 gallons of water. So with our area’s precipitation average at about 46 inches per year, we should be able to collect enough water to make our purchase worth it. Some benefits of rain water harvesting would include:

-Rainwater is a relatively clean and free source of water

-It is environmentally responsible

-It promotes self-sufficiency and helps conserve water

-It is better for landscape plants due to its lack of Chlorine

-It reduces stormwater runoff

-It can provide an excellent back-up source of water for emergencies (like a Zombie Apocalypse perhaps)

Here is a diagram to show how rain water harvesting works:

rainwater-collection-diagram

When it rains the water from the roof will flow through the downspouts into a filter screen and into the tank underground. An electric pump will then send the rain water from the tank to a valve box. This valve will automatically switch from rainwater to city water when the tank gets to a preset level. The water will go through a final system of filters before use.

La Roof

Well….. It’s been a while since I posted last… a.k.a. Way Too Long. So here is part 1 of 3 of our recent progress.

Our roof arrived, in many pieces of course, and as you can tell from the trees in the picture, it wasn’t yesterday.  Our roof consists of a few different pieces, including: perlins, sheet metal roof, trim, guttering, sofits, huge beams, and one downspout which will take our water to our rain barrels. We chose to go with metal, not just to go along with our theme of a seemingly all metal house, but because of its benefits. Some of these benefits would include:  heat reflection off our white sheet metal roof, low to no maintenance, will last a lifetime, and it will allow us to maximize our water collection, with little debris, for storing and using in our gardens.

Untitled

The installation took a few days due to the windy and rainy weather. The steps for installation were to weld the three beams to the top containers. These beams cantilever over the deck, giving us protection from rain and the elements while we enjoy our outdoor living space.

Untitled

Untitled

Untitled

Here is a picture showing the perlins installed. After this step the insulation was put in place,  sheet metal roof was screwed on, and the trim was installed along with the guttering on the back side, and the downspout for rain collection.

Untitled

Untitled

Untitled

The next step was to paint the beams to match the trim. After painting the beams the sofit was then installed, which is a charcoal grey color, which we thought would be a nice contrast from the lighter grey trim and beams.

Untitled

Six LED can lights were then added to the sofit to give us light on the deck. Here is a picture of the final product. Our next steps are to stud out the top story, spray foam insulation, and install wafer board and house wrap to prepare for the upstairs windows. (These steps have already happened, I will make another post soon with those pictures)

Untitled

With the left over grey paint we had we went ahead and painted our carport “storage” container.


Untitled

The next posts will include: Stud installation, spray foam, wafer board, and maybe a sneak peek at some of our siding!

Vintage Finds

As most of you know, Tyler and I are a little obsessed with all things vintage. So naturally our house will be filled with our vintage finds. Our lastest find was a Broyhill Brasilia dining set, a popular mid-century modern design. We  purchased 10 chairs total, 4 armchairs and 6 side chairs, as well as a large table with 3 leaves, that extends to seat 10, and a china hutch to match. Needless to say, we were in L.O.V.E.

Here is a picture of what the table and chairs look like, (These are not ours, because sadly ours went into hiding.. aka storage)

Credit: http://theculturalpsychologist.blogspot.com/2011/05/broyhill-brasilia-dining-room-suite.html

Here is a picture of our china hutch (sorry not the best picture)

Untitled

The Table and the china hutch need some refinishing: for example the white you see on the china cabinet will have to be stripped off and restained, same goes for our dining table.

But… can you imagine my new/old Franciscan Silver Pine China set I found, displayed in this case during winter, I can, and I Cant Wait.

Here is a small place setting of my 40 piece set that I found at an estate sale for an amazing price.

Untitled

Now I have been contemplating what light fixture would look best above this spectacular piece of furniture, and I have decided on..

Maybe a George Nelson, or George Nelson inspired Saucer Light:

Credit: http://www.grassrootsmodern.com/2009/01/28/new-ikea-365-items/

So there is a run down of our current dining room design ideas. Check back soon (well I say that) for an house update. The Stone is currently being layed, and our fireplace is taking shape!

No Longer Topless.. Thank Goodness

Lots of things are happening at the Bright Container House! Take a look at some of the work:

After the last three containers arrived, Tyler and Matt began cutting the openings in between the containers and grinding them smooth. The exterior openings wont be cut until right before the spray foam and wafer board is up, so it stays dry… (Lesson Well Learned)

The opening for the stairway was cut out of the floor of the container and braced with 6 inch angle iron. (Here is Matt conquering that task)

Untitled

The insulation was sprayed on the bottom half of the containers, using an open cell foam. The open cell foam has better sound deadening properties then other types of insulation, and has an equivelant R-Value of 40. (pretty dang good in layman’s terms.)

Untitled

Untitled

Wafer board is up:

Untitled

Holes were made through the concrete, using this core driller, to allow plumbing vents and air conditioning lines to pass through.

Untitled

Untitled

Plumbing was roughed in for the upstairs bathroom and vents for downstairs were tied into one. (Here is a picture of some of the plumbing, I’ll add more once I figure out where those pictures went)

IMGP0023

Square tubing was bolted to the bottom floor by drilling through the concrete and steel beams. The containers then set on top of the tubing and will be welded into place.

IMGP0024

The Crane truck arrived early last Thursday morning to set our last containers

Untitled

The Crane truck getting in position…

Untitled

The first container on its way up with direction from Tyler and other helpers on the ground.

IMGP0011

Manuevering it into postion.

IMGP0014

Matt using his manly sledgehammer force to bump it into place..

IMGP0019

Now multiply these steps by 3…

And you get A SUCCESSFULL TOP STORY INSTALL.
Untitled

Thanks to lots of family and friends for making all this possible. (My mom and Sheilah were also there just not pictured)

_DSC0905 - Version 2

P.S.

If you are interested in knowing any more of the nitty gritty details, feel free to email Tyler at Tylerbright@me.com.

P.S.S.

Our bottom story windows are currently being installed, so check back to see those exciting photos! Also, I will try to start updating weekly now since a lot is happening quickly. (but who really knows with me)

Look at Those Studs

Look at those studs, and no, I am not talking about Tyler and Matt, (sorry Tyler).

Check ’em out (but excuse the mess… it’s a construction site)

_DSC9603

_DSC9617

7665659106_2f6a1399f4_o

The master bedroom extension:

Untitled

The back wall with the fireplace and windows (can you picture the rendering yet?)

_DSC9611

Screen Shot 2012-07-14 at 8.26.56 PM

Our electrical panel was installed, and electric was ran to the exterior walls to prepare the house for insulation and wafer board.

Untitled

Here is Kent and Tyler’s homemade electrical wire reel… A “Bright” idea.

_DSC9622

_DSC9625

(I just had to have outlets on both sides of the front door for Christmas decorations … I know, I’m difficult)

Untitled

To protect the house from moisture under the containers before it is completley dried in, Tyler sealed the bottoms with spray foam. (Like 22 cans of it)

Untitled

Untitled

And some other exciting news: We got our final three containers, some of our windows arrived, and the insulation was sprayed yesterday!